

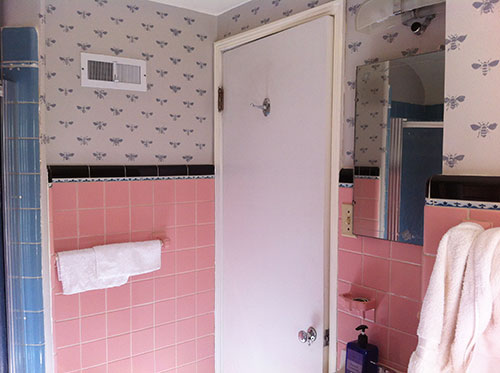
Attached is a picture of my beloved pink (and a little blue too) bathroom before and after I painted the upper walls grey and stenciled bumblebees on. I think the key to making everyone fall in love with the pink bathroom is strategic use of color. A decorator relative of mine told me that painting light grey and adding a stencil design would really help the pink be appreciated, even by those who don’t normally appreciate the retro. And it worked! Before the white walls/pink tile provided too much of a contrast, and the whole room had a different look/feel. Now, however, it is loved by all who visit it!
Evaluating contrasts and how they affect a room
The problem: While high contrast can work in some decorating situations, Lindsay’s small vintage bathroom felt a little too in-your-face with its mid-value pink tiles and especially, its dark black border tiles set right against a stark white wall color:
- This color configuration caused the dark bullnose and decorative liner tiles to pop off the walls — making them the first thing visitors noticed.
- And, since the walls were light, the charming curve over the window could not be “seen” and instead, what visitors noticed were the dark jagged lines of black tiles around the center of the wall and the pink tile field — which unfortunately is not a color that everyone loves.
The fix:
- Choosing a neutral color that was close in value to the pink tiles — in this case grey — to paint the upper portion of the walls, Lindsay lowered the contrast between the dark liner tiles, wall tiles and the rest of the walls.
- This darker wall color also allowed the charming curved ceiling detail to be easily seen.
- Adding the painted bee pattern in a darker shade of grey added more visual weight to the upper portion of the wall — creating a balanced look that achieves visual unity in the space.
- The dark bee pattern relates to the dark liner tile allowing it to “make sense” in the room’s design instead of just being a dark outline.
- The painted bee pattern also relates to the decorative liner tile. The positive and negative spaces in the liner tile are very similar in shape to the painted bees — which also adds to the cohesiveness of the space.
- When it came time for the finishing touches, Lindsay smartly added a few more dark elements to the wall — such as the thick black framed family photo — to make the room feel charming, balanced and inviting.
See more stencil projects:
- Retro wall stencils — patterns and tips from 7 reader projects
The post Paint + stenciled bumble bees transform Lindsay’s vintage pink bathroom — delightful! appeared first on Retro Renovation.
No comments:
Post a Comment